(Sorry for the delay in posting the second part in this series. Here’s what I had been doing: https://ubercyber.net/touchTrack.)
We have discussed a little bit about “composition” in photography in the previous article. I tried to keep the discussion absolutely non technical. But now since we are going to get into exposure, a little bit of technical details have to come in.
Before we start talking about exposure, let me discourse about the focal length of a lens. This will be required while describing aperture. The focal length of a lens is, of course, the distance between the inner lens and the film (or sensor for digital cameras) when the lens focuses on a subject at infinity. The higher the focal length goes, the more magnified the image appears when captured by the camera.
The prime lenses, ones that do not have zoom, have a fixed focal length. The only thing these lenses have to achive is to focus on a subject. But zoom lenses have a range of focal length (e.g. 70-300mm), and they have to change the focal length and focus on the subject as well according to the photographers wish. This attribute makes them a lot more complex than prime lenses, and usually prime lenses have better focussing capabilities – and hence can produce sharper pictures – compared to zoom lenses.
One thing to remember here is that the focal length that is mentioned on the lens is specified assuming 35 mm film or sensor (for SLRs) or the length is converted to corresponding values as compared to 35 mm cameras (for point and shoot digital cameras). This is not that important for point and shoot cameras or film SLRs, but becomes important for Digital SLRs. The reason is that most entry level digital cameras do not have a 35 mm equivalent sensor in order to reduce the camera price, they have smaller sensors. Which means a smaller portion of the image is captured, which corresponds to a little bit of zooming. If we compare images taken by a 35 mm SLR camera and an entry level camers using the same lens, we will see the difference. When using an entry level camera, this is advantageous while zooming, because we already have a bit of zoom because of the sensor size. However, when taking wide angle shots, this becomes a problem for these cameras, and we have to use wider lenses (lower focal length lenses) compared to 35mm SLRs if we want to take the same wide angle shot.
With that primer on focal length behind us, lets move forward to the next item in our Holy Trinity of Trinities.
Exposure
In simple words, exposure corresponds to the amount of light captured while taking a snap. There are three ways we can control this amount of light.
By changing the film speed or ISO:
If we change the film speed, the amount of light does not change. However, higher ISO films (or higher ISO settings in digital cameras) are more sensitive to the same amount of light, so by increasing the ISO, we can take similar pictures in darker surroundings keeping the other settings unchanged. This means in brighter surroundings (like outdoor shooting in sunny days) we should use lower ISO, and for darker situations (outdoor shooting in cloudy weather or in the evening) or for indoor shooting we should use higher ISO. One thing to remember here is that since higher ISO enhances the ambient light, the pictures become grainier. The sharpest and smoothest shots are usually taken with ISO 100 or 200, although high end digital SLR cameras can take excellent shots even at ISO as high as 1600 or more.
Let’s see how the ISO setting changes the picture.
The following image is takes at an ISO of 100:
ISO 100, being one of the lowest available ISO settings, gives the best quality picture. All the colors will be reproduced smoothly. Click the image to view the larger image.
The following is at an ISO of 400:
Although it may not be very obvious, but grains start to appear at higher ISO levels. Click to view larger.
And this one at ISO 1600:
Here grains are quite obvious. So much so that a 100% crop of the image may not be usable. Click to view larger.
It may seem that it is always a good idea to shoot at low ISO level, since these levels produce clean pictures. However, it may not always be possible to do that. In low light conditions and in sports photography, when a fast shutter speed or low depth of field is required (we discuss them next), it is often necessary to bump up the ISO. As I mentioned before, expensive cameras can produce excellent images even at high ISO settings, and sometimes the image may look better with some grains – it may produce some nostalgic effect.
By changing the aperture:
Aperture is a circular (or hexagonal or pentagonal) hole in the lens through which the light enters the camera. The radius of this hole can be increased or decreases to increase or decrease the amount of light entering the camera.
The aperture is measured by f stops. The term “f” here refers to the active focal length of the camera. So an aperture of f/4.5 means the diameter of the aperture hole the current focal length of the lens devided by 4.5. The higher the f stop, the smaller the hole, and hence the lower the amount of light that enters the camera. Increasing the f stop by 1 stop has the same effect, as far as the brightness of the captured image is concerned, as reducing the ISO of the film by 1 stop.
However, the aperture has a more important effect on the captured image than merely controlling the brightness. It dictates the “depth of field” of the captured image. “Depth of field” refers to how much area of the image will be in focus. As we increase the f stop value (decrease the radius of the aperture) the depth of field increases, but the amount of light entering the camera decreases.
The wide angle shot shown in the previous article was taken with a high f value, while the close shot of the flowers were taken with a low f value. This is why they have so different depth of fileds.
In order to demonstrate further how depth of field changes with aperture settings, let’s see a few pictures.
The following is taken at f/1.8 – one of the smallest f stop values available in some lenses. Notice how we have a very shallow depth of field:
The next one is taken at f/8. The depth of field increases, but still some parts of the image are not in sharp focus:
This next one is taken at the maximum f stop value available for the lens – f/22. This is probably overkill, but it helps make a point. Notice how the whole image is in sharp focus here:
Why do we need to think about aperture settings or depth of field? An image with low depth of field gives the viewer an idea about how distant the objects in the image are. In the examples above, the first image exaggerates how the books are arranged – some of them closer to the viewer, and some of them further. However, as we increase the depth of field, the image starts to look more and more flat. The idea of distance from the viewer diminishes.
In general, portraits and still life photography require low depth of field, whereas nature photography asks for the whole scene to be in focus. But as I have told before, there are no hard and fast rule, and still life photos with high depth of field or natural photography with shallow depth of field can often produce interesting results.
By changing the shutter speed:
The shutter speed determines how long the shutter is kept open during taking a picture. Of course, the longer it is kept open, the more light can reach the film or sensor. However, we can produce interesting effects by changing the shutter speed while photographing moving objects.
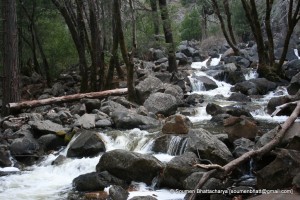
Consider the following images. This one is taken at a shutter speed of 1/60 seconds:
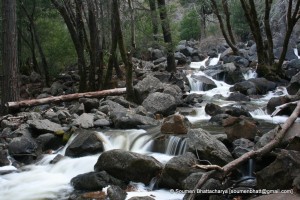
And this one is taken at 1/3 second:
The first one “freezes” the water flow at a high shutter speed. We can almost see the individual drops of water. However, the second image, with a lower shutter speed, makes the water look somewhat smokey. Slow shutter speed can often lead to very dreamy or surreal effect.
One thing to note here is that when taking a photo at slow shutter speed, the camera should be steady. Otherwise the picture will not be sharp. A tripod and remote shutter release are best options, but there are other ways to have a steady shot. In my opinion though, it is always good to have a tripod and remote shutter release, irrespective of the shutter speed used. They help produce much sharper pictures.
The photographer has to keep in mind all three exposure elements – ISO, aperture and shutter speed – while taking a picture. It is often a good idea to snap the same subject multiple times, while varying the exposure elements a little each time.
So now we have seen how to compose an image, and how to decide on an exposure while taking the picture. In the next part we will see what to do with the picture once it has already been taken – the post processing part of photography.


Hello,I love reading through your blog, I wanted to leave a little comment to support you and wish you a good continuation. Wishing you the best of luck for all your blogging efforts.
Thanks very much for your comment! Hope to see you soon again.
If possible, as you gain information, please add more related content to your blog as I already bookmarked you and I intend to come back. I have found it extremely useful.
Spitze Design hat dieser Blog. Woher hast du die Vorlage ? War bestimmt sehr teuer.